Friday 6 January 2017

Finished Object Friday: Teal Scarf


Hello all!

I just want to share the first knitted item that I've finished this year.  I made about 90% of this scarf in 2016, finished and block it this past week.


The pattern that I used was a variation of the Diagonal Twist Scarf by PurlSoho.  It's a beautiful pattern and it's pretty simple to follow after I looked up some videos on how to do right and left twists.  The twists give a nice detail to the scarf that makes it more interesting than just a stockinette stitch.

I used a little over two balls of Patons Decor in the colour New Teal. It is a acrylic and wool blend.   I love the colour and got a bunch of skeins of it at a yarn sale a couple years back. So this project was a a bit of stash buster.
Dog for Scale 

I reduced the amount of stitches from the original pattern.  I originally was going to do the scarf with 66 stitches as the pattern said. I found it way to wide and I didn't think that I would be motivated to finish the project. So I did the pattern with 40 stitches instead.

I followed the 4 rows of pattern until I reached what I decided was the middle to the project.  Then for the rest of the pattern I did right twists to the middle and left twist from the middle to the end. So the opposite of what the pattern instructs.  This changed the diagonal shapes from pointing downwards to upwards.  I did this to add symmetry for when I was wearing the scarf but it also made a nice diamond shape in the middle.


While I was knitting this scarf the edges would be rolling in constantly.  I am so envious of knitters that can knit without their edges rolling in on them.  That's something I am going to work on this year.  So I needed to block the scarf once I finished weaving in the extra yarn.

Scarf before Blocking

I know that wet blocking would not work from acrylics yarns such as the one I was knitting with.  I did a little research and the consensus was that a steam block would be suitable for acrylics blend yarns.  I'm really glad that I blocked it since it changed the look completely and I think it really makes it more professional looking.


Here's another picture of the scarf.  I've worn it out a few times already and it is really warm and nice.


But that's pretty much everything for now, I'm planning on posting more projects this year. So look out for to that in the future. 

Monday 31 October 2016

Finished Object: I want to Believe Mittens

Back in August,  I was getting ready to move and came to the epiphany that most crafters have... I own a lot of yarn! More than I really need.  So I posted on my Facebook asking my friends if there was anything that they want me to make them.  One of my friends wanted me to make a pair mittens inspired by the show, The X-Files.   

I actually have been watching X-Files for the first time recently.  I never watched the show when it first aired, mostly because my parents didn't watch it and a kid my age probably should not be up late watching scary aliens.  One day I was on Netflix and decided to start it. People I know spoke well of it, so I gave it a shot.  I'm in season 4 and so far I am really liking it! So I was super excited to make mittens inspired by the poster that is in the office of the FBI Building.  

Here's the mittens that I made up, I'm over the moon with how they came out.  

The Back of the Hands

The Palm of the Hands

Very Spooky 


Happy Halloween! 


Saturday 17 September 2016

Tutorial - Retro Coaster


I was in Michael’s a while back, in the needle point aisle.  I was itching to do some cross-stitching and was getting some supplies.  While I was there I saw these cute plastic canvas squares.  I think they are 3" x 3" and thought that they were perfect coaster sizes.  So I decided to make just that.  Also making these coasters would use up some of my stashed yarn.


Materials:
-Plastic canvas, you can buy the ones that are already in squares like I did. Or get a sheet and cut it to down to size with regular scissors
-Worsted Weight Acrylic yarn in two to three different colours  
-A acrylic felt sheet in a complementary colour   
-Sewing thread in a complementary colour    


Supplies:
-Scissors
- A needle with an eye large enough to fit your yarn through
- A smaller needle for your sewing thread


Steps:
Step 1: Figure out your pattern
The pattern I created is inspired by a vintage needlepoint techniques book that I got from a garage sale.


Here’s a picture of the pattern I used, it is 26 by 26. The same size as the plastic canvas squares I got.
costere.JPG

But you
 can do whatever pattern you want, by either drawing on graph paper or looking at patterns online. 


Step 2: Making Top of the Coaster


Now you will use your yarn to stitch the coaster. Cut the yarn in the first colour you want to use, I used the black and cut to be about 30 cm or about a foot long.  You a don’t want the yarn to be too long or it will knot on you and make your life miserable.  It's better to use multiple smaller threads than one super long one that will knot.  I also found that using short thread allowed me to change colours more easily since I didn’t have all this extra yarn hanging in the way.


Step 3: Finishing the Pattern
Continue stitching the pattern and once your running low on yarn or finished with that colour, on wrong side of work poke your needle through a few of the little loops that the stitches create and cut the extra thread.


Step 4: Cutting the Felt
Once you’re all done with the design of the coaster and cut the extra threads, lay it on the felt, trace it and cut a square that is the same size of your coaster.


Step 5: Hiding the Ugly Parts
With the sewing thread and needle you’ll want to sew the outside of the felt to the outside of the coaster.  

Since the sewing thread is much thinner than the yarn, you can knot it without adding bulk to the work.


Sew the felt to the coaster by stitching it on to the outside loops. 


Go around the outside of the work.  Try to keep the stitches close to the edge of the felt but not so close that it will easily rip out.  


Once you've gone around, just knot and cut the thread 


Step 6: Hiding the Thread
At this point you can still see the plastic on the outside of the coaster. With a yarn that is one of the color of your coaster go around the edge of the coaster .


Poke the yarn through a few loops of the thread you just sewed to anchor the yarn.


Go around the coaster trying to make sure that the yarn is covering the plastic canvas and thread. Don't bring the yarn through the felt, it will be really hard to pull through and might tear the felt.  You want to just use this yarn to wrap around the plastic edge. 


Once your made it back to the point where you started, poke your thread into felt and bring it back out a inch or so close to the edge. 


Cut the extra thread as close to the felt as possible. 


And your done!


I really like my coaster that I’ve finished so far.  I want to make a full set but I haven’t gotten around to finishing them (I’ll let you know when I do)  I was worried that it would melt if I put hot drinks on it, but that it not the case. I've been using the coasters I've made for a few weeks now and its been great! I have put mug of tea on it multiple times and nothing awful has happened!


If you end up making this let me know in the comments, or tag my on instagram (@ChipkeyCreations)  I would love to see it!!


Cheers

Thursday 18 August 2016

Making a Nick Cage Skirt

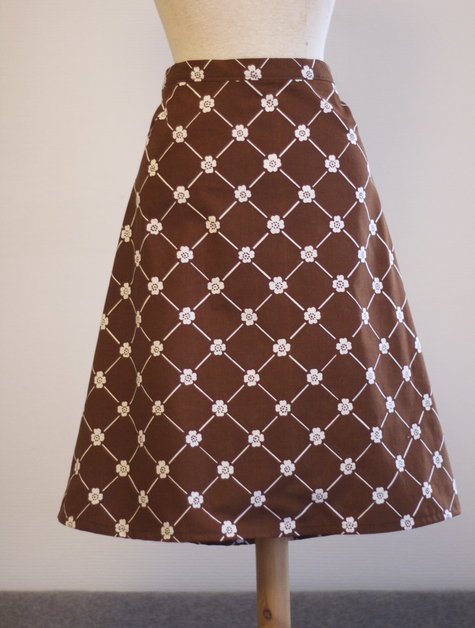
Summer is here and now is the season for skirts, flowers and twirling around.  I just wanted to share a skirt that I made in March as a break from projects and school work towards the end of the semester. Sorry it took this long to share with you, I’ve been trying to spend as much time outside as possible before the cooler weather hits again.


About the fabric:

I have a friend that can do graphic design stuff, she’s extremely talented and I’m jealous of her. She made this pattern when she was bored one day, she posted the design of Facebook as a joke and people were telling her that they would totally buy the design as a fabric if she found a way to do it, which she did.  She uploaded the design to Spoonflower and told us that if we wanted any fabric to let her know.  So I’m part of a small group of people in the world that has this fantastic fabric. It is not on the site anymore, but she does have a shop that sells stickers and bags with the design on it (Link Here).

About the skirt:

When I first got the fabric I was planning on making a circle skirt.  Since it’s a relatively easy way to make a skirt and it would allow for nice twirling when I was wearing it.  When I went to start the skirt, I noticed that I would not have enough fabric. Since circle skirts require a lot of fabric unless I wanted the skirt to be really short, which I didn’t. So I had to reevaluate.  I looked on Pinterest to find what kind of knee length skirts that were out there.

From my Instagram  (@ChipkeyCreations)


I came up with three different ways I could make the skirt that I would have to decide on.
A skirt where I bunch up the top and have it kind puff out from there, which would probably have been the easiest skirt to make. A baste stitch to bunch the fabric, a waistband, or elastic and then some hemming.   But I didn’t like the idea of so much of the pattern being unrecognizable because of the bunching.
Photo source: www.handmadiya.com
The second idea was a A-line pencil skirt, where I would cut the fabric into the trapezoid and sew down the edges but I didn’t want waste the fabric by cutting some of it off. Also I didn’t think the seam on the side would look nice since it would cut off half of the flowers and made odd looking seems.    
Img_2062_large
Source: www.burdastyle.com/
So I decided to go with a pleated top, midi skirt.  I found midi skirts on Pinterest really pretty and I thought the pattern of the fabric would really shine with this style of skirt as the flowers peak pass the pleats as I walked.  It’s a rectangular piece of fabric that is pleated at the top so I would not have to worry about the sides of the fabric patterns being awkwardly cut up.

About the process:

So I got two yards of the fabric, and the first thing I had to do was figure out how to cut the fabric. I had to figure out how long I wanted the skirt to be and line it up with a repeats in the skirt so the pattern would be consistent on all the pieces of fabric.  


After some measuring and double checking everything, I figured out that I would need my skirt to be three flowers long.  I used a T-square and chalk to mark out where I was going to cut, then took a deep breath and cut the fabric.

The First Cut is the Deepest
The fabric was 40 inches wide. I was able to take my hip measurement and divide it by two. Because that 40 inches piece would be used to cover half of my body. With that difference, I figured out how much extra fabric I would have to make the pleats. 


The way the fabric pattern repeats itself I was able to line it up on the sides and the back of the skirt so that it looked pretty seamless. I had to keep this in mind while actually sewing the skirt to make sure that the pattern would match up.


After I figured out all of my pleats, I pinned it all down and ironed.  After that I did a baste stitch across the top.  This is when you have really long stitches that you don’t backstitch so that you can easily remove the thread later.  I did this so the pleats won’t move around on me and I can remove the pins and not stab myself.  


When I was planning on skirt, I really wanted it to have pockets and I wanted it to be lined since the fabric was a little too see through for my taste.  Before sewing the sides together, I needed to have my pocket pieces ready.  I had a dress that had pockets and I used it as a guide to figure out the shape of the pockets for this project.  


I used skirt pieces that I already figured out as a pattern for the lining pieces. I just laid the patterned fabric onto lining fabric and cut around making the lining piece a little shorter then my patterned fabric piece.


The next part was the hard part, which if I ever make this skirt again I would figure out a better way to do it.  I needed to put the zipper in. It would be going through the waist band, the skirt part and the lining at the same time. It was kinda hard to do and took a couple tries to get.  

Next I sewed down the sides to connect the front and back of the skirt, being careful to sew around the pocket and not sew them shut. Then I did the same for the lining pieces minus the pocket since the pocket would be between the wrong side of the fabric and lining, like a sandwich. Next I sewed the waistband over the top of the skirt and removed the baste stitch.


Lastly I hemmed the lining and the bottom of the skirt.  Ironed everything to make it look really nice and then it was done.
I wore this skirt for a group presentation for school and my group members thought the skirt was great.  After class I was waiting for the bus and two people stopped on different occasions to tell me they loved the skirt. Which is one of the compliment a crafter can get about their work.  Over all I’m so impressed with how this skirt came out, I really like the fabric pattern and that it has all the things I like in the skirt, pockets, lining, crazy patterns.

Sunday 29 May 2016

Pillow Cover - Tutorial

Two of my old roommates have moved out of our house (since the lease is up) and into their own apartment.  The place is super cute and they’ve been making it look really nice.  They’ve got art and accent pieces all in blues in their living room and it looks like an adult apartment.  They got a new couch and asked me if I could make pillow cases for the pillows they wanted to throw onto it. They were thinking of buying some cases but they are crazy expensive, it’s un-proportionally high for the amount of fabric you’re getting.  When we were shopping together there was a small case, no pillow on sale for $40! It wasn’t even cute looking, I don’t understand these prices.  So my roommates decided that buying the fabric and letting me make them cases would be better since they can pick a fabric they like and not be restricted by what is in the stores.  The pillows I made were super fun to make and a great beginner project, the cases don’t come off the pillows so there is no need to worry about zippers.  


Things you need:
- A metre of fabric of your choice, this cotton fabric is from Fabricland
- A pillow, for this project I’m using the 50cm x 50 cm (20” x 20”) pillows from Ikea
- Newspaper for a template
- Sewing machine
- Needle and thread
- Pins


Steps:
1) Use the newspaper to make a template of the pillow, mine was just a square and probably could have gotten away with skipping this step but I wanted all of my sides to be straight and really ensure that each fabric piece would be the same size. I added a centimeter of seam allowance on to each side and cut the newspaper down to the size I needed.


2) After washing and ironing your fabric, place it on a flat clean surface and fold in half, having the patterned sides of the fabric facing each other.

3) Place you template on your fabric and pin into place, and cut.  I am making two pillows with this piece and I ended up with 4 pieces of fabric.


4) Place two pieces together, rights facing each other.  If your fabric is patterned ensure the patterns are going to the same directions. Pin the pieces together and leave a space on one side that will be big enough to put your pillow into.

5) Sew around making sure that you don’t sew the whole thing closed.  With scrap fabric do some test stitches to make sure the stitches are tensioned properly for the fabric you’re using.


6) After you’re done sewing, cut the extra fabric off the corners of the case, this will make for sharper corners to your work. Make sure you don’t cut the stitches themselves.  Also if you had a really big seam allowance you can trim off any extra fabric.


7) Put as much of your hand in the hole you created and pull the fabric through the hole.  This will turn the pillow inside out. After that use a pencil to push the fabric in the corners more to really make them pointy.

The pillow after the corners are pushed out


8) If you want to, you can iron the case.

9) Put the pillow into the case.  With the first pillow I took it out of the plastic and then spent an hour trying to stuff the pillow in to the case because I made the hole too small. With the second pillow I measured the circumference of the pillow in its packaging and made sure that the hole I left would be bigger.  Then I cut the top of the pillow packaging and put the whole thing in the hole I made and held the pillow in place as I pulled the plastic off.  The pillow then just unfolded itself into the case.  This took less than 30 seconds.  
The first pillow, mid stuffing

Second pillow, which was faster

10) Make a blind stitch to close up the hole.
Take your needle and thread and double your thread and knot. Make sure your thread is long enough to close up your hole, but if it is too long there is more of a chance that the thread will knot as you’re working.

You should also pin your hole closed so that you do not get fabric moving around on you.
From the inside of the fold, poke your needle and poke it back through a few millimeters on the inside fold of your fabric and pull through.


You will be sewing the fabric on the inside of the fold of the hole to bring the two pieces of fabric together while trying to hide the thread.

You can't tell where the blind stitch is 

11) Fluff up the pillow, I was told that if you leave the pillows in the sun they will fluff up on their own. I left the pillows in a room with sunlight for a day and they did seem to have fluffed up a little bit, but I can’t tell if it was because of the sun or not.  

When I was done I took the pillows to my friends house and was trying to take photos of the pillows, but my friend kept jumping into all of the photos I was trying to take. So I am including some of the photos I have of her and the pillows.