
Summer is here and now is the season for skirts, flowers and twirling around. I just wanted to share a skirt that I made in March as a break from projects and school work towards the end of the semester. Sorry it took this long to share with you, I’ve been trying to spend as much time outside as possible before the cooler weather hits again.

About the fabric:
I have a friend that can do graphic design stuff, she’s extremely talented and I’m jealous of her. She made this pattern when she was bored one day, she posted the design of Facebook as a joke and people were telling her that they would totally buy the design as a fabric if she found a way to do it, which she did. She uploaded the design to Spoonflower and told us that if we wanted any fabric to let her know. So I’m part of a small group of people in the world that has this fantastic fabric. It is not on the site anymore, but she does have a shop that sells stickers and bags with the design on it (Link Here).
About the skirt:
When I first got the fabric I was planning on making a circle skirt. Since it’s a relatively easy way to make a skirt and it would allow for nice twirling when I was wearing it. When I went to start the skirt, I noticed that I would not have enough fabric. Since circle skirts require a lot of fabric unless I wanted the skirt to be really short, which I didn’t. So I had to reevaluate. I looked on Pinterest to find what kind of knee length skirts that were out there.
 |
| From my Instagram (@ChipkeyCreations) |
I came up with three different ways I could make the skirt that I would have to decide on.
A skirt where I bunch up the top and have it kind puff out from there, which would probably have been the easiest skirt to make. A baste stitch to bunch the fabric, a waistband, or elastic and then some hemming. But I didn’t like the idea of so much of the pattern being unrecognizable because of the bunching.
 |
| Photo source: www.handmadiya.com |
The second idea was a A-line pencil skirt, where I would cut the fabric into the trapezoid and sew down the edges but I didn’t want waste the fabric by cutting some of it off. Also I didn’t think the seam on the side would look nice since it would cut off half of the flowers and made odd looking seems.
 |
| Source: www.burdastyle.com/ |
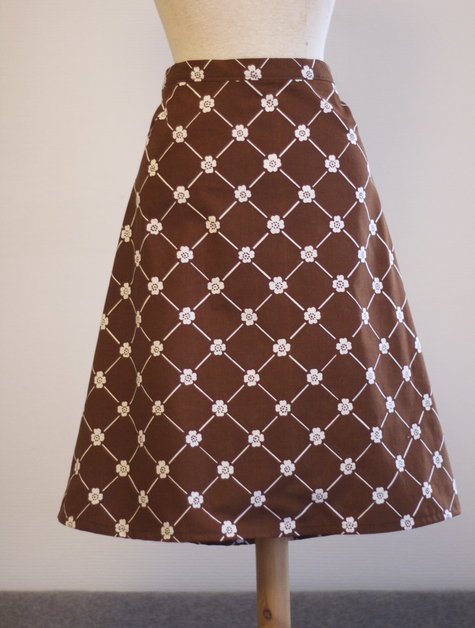
So I decided to go with a pleated top, midi skirt. I found midi skirts on Pinterest really pretty and I thought the pattern of the fabric would really shine with this style of skirt as the flowers peak pass the pleats as I walked. It’s a rectangular piece of fabric that is pleated at the top so I would not have to worry about the sides of the fabric patterns being awkwardly cut up.
About the process:
So I got two yards of the fabric, and the first thing I had to do was figure out how to cut the fabric. I had to figure out how long I wanted the skirt to be and line it up with a repeats in the skirt so the pattern would be consistent on all the pieces of fabric.

After some measuring and double checking everything, I figured out that I would need my skirt to be three flowers long. I used a T-square and chalk to mark out where I was going to cut, then took a deep breath and cut the fabric.

 |
| The First Cut is the Deepest |
The fabric was 40 inches wide. I was able to take my hip measurement and divide it by two. Because that 40 inches piece would be used to cover half of my body. With that difference, I figured out how much extra fabric I would have to make the pleats.

The way the fabric pattern repeats itself I was able to line it up on the sides and the back of the skirt so that it looked pretty seamless. I had to keep this in mind while actually sewing the skirt to make sure that the pattern would match up.


After I figured out all of my pleats, I pinned it all down and ironed. After that I did a baste stitch across the top. This is when you have really long stitches that you don’t backstitch so that you can easily remove the thread later. I did this so the pleats won’t move around on me and I can remove the pins and not stab myself.
When I was planning on skirt, I really wanted it to have pockets and I wanted it to be lined since the fabric was a little too see through for my taste. Before sewing the sides together, I needed to have my pocket pieces ready. I had a dress that had pockets and I used it as a guide to figure out the shape of the pockets for this project.


The next part was the hard part, which if I ever make this skirt again I would figure out a better way to do it. I needed to put the zipper in. It would be going through the waist band, the skirt part and the lining at the same time. It was kinda hard to do and took a couple tries to get.

Next I sewed down the sides to connect the front and back of the skirt, being careful to sew around the pocket and not sew them shut. Then I did the same for the lining pieces minus the pocket since the pocket would be between the wrong side of the fabric and lining, like a sandwich. Next I sewed the waistband over the top of the skirt and removed the baste stitch.


Lastly I hemmed the lining and the bottom of the skirt. Ironed everything to make it look really nice and then it was done.
I wore this skirt for a group presentation for school and my group members thought the skirt was great. After class I was waiting for the bus and two people stopped on different occasions to tell me they loved the skirt. Which is one of the compliment a crafter can get about their work. Over all I’m so impressed with how this skirt came out, I really like the fabric pattern and that it has all the things I like in the skirt, pockets, lining, crazy patterns.