Saturday 19 September 2015

Demotivational Banner Alternative Method

In the post I made last week, I posted tutorial on how to make your own demotivational banner, to add to your walls.  After I made the first one, I made a second one with a slightly different method.  So this is just a quick post on how to make an alternative method of making the banner.


Most of the steps and general concept are the same. I started by taking some black paint and writing "Meh.".  That's what my roommate suggested I do and I relate to the sentiment.  I free handed it and hoped that I wasn't going to it mess up.  If I did all I could say was: Meh.  


Next I took my dowel and folded my felt over.  With some iron on hemming tape, I ironed on the edge to fuse the two sides together.  It might not be as permanent as sewing the piece together, but I believe this is a good alternative if you don't have a sewing machine or patience to sew.     


I wanted a different bottom for this banner so I took a cake pan and traced the shape (its diameter is the same as the width of a 8 1/2 by 11 piece of felt. 


I did the rest of the steps as in the other tutorial and Voila! 


I hope this gives you inspiration for others ways to make this project.


Saturday 12 September 2015

Demotivational Banner DIY


So the new school year is upon us, as a university student I know many people are either just moved into residence or into off campus housing that are needed to find some ways to add some personality to their walls.  A demotivational banner will always remind you that the world sucks and no one cares about you, in the most charming way possible.  It is also a great way to add some art to a dorm residence, so that it doesn't look as much like a prison cell.


Materials:
-A piece of felt in the colour of your choice.
-Paint and paint brush
-Cardboard
-A wooden dowel (or a stick you can find outside)
-Yarn
-Needle and Thread or hot glue

Also:
-Scissors
-Ruler
-Pen


Steps:

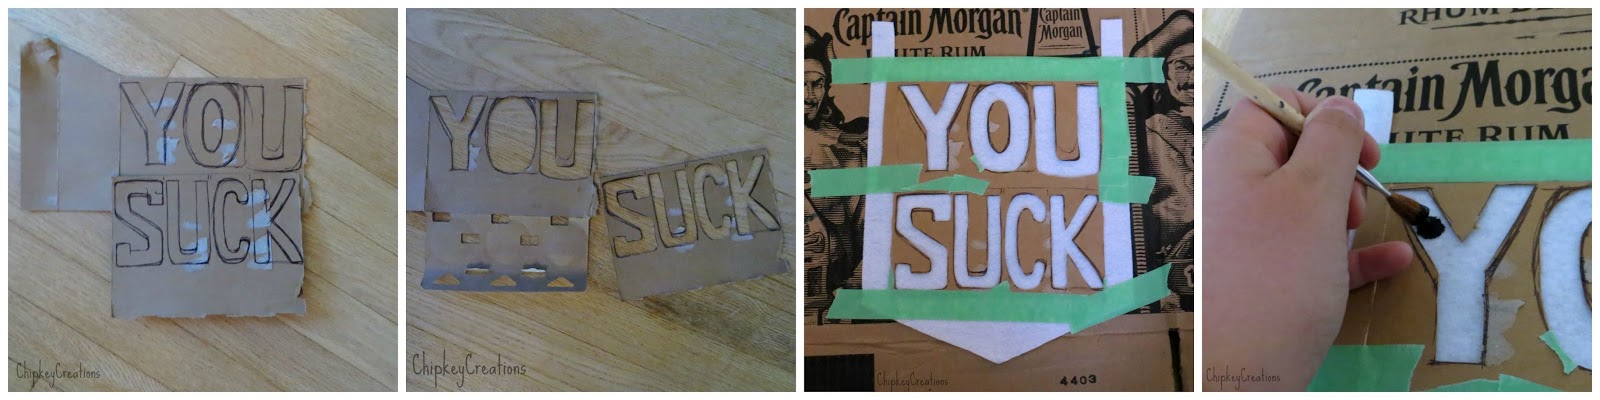
1) Figure out what you want to say.  I made one that says “You suck”, my roommates said it was mean, so I made another that says “Meh.” (which you can read about here).  Other suggestions would be “Why Bother”, “Just do it. Or not”, “Whatever”.  I would not recommend picking something with too many words or it will be hard to fit all of it on.

2) Cut your felt into the shape you want.  For one of the banners I wanted a point at the bottom so I used a pen and ruler to mark out the shape on the back of the felt  then cut it out.  I folded the felt and marked the middle with a pen on the back of the felt.  Then I measured 5 cm up and connected the lines to make the point I wanted.


I also folded over top of my felt over the dowel I'm using and making a mark with my pen.  Then I cut the felt to make what will later become the loops at the top of the piece. 


3) For this step you have two options.  You can free hand and paint the words on. Or you can print what you want cut that out and use it as a stencil.  If you’re going the stencil route, you dab the paint on, making sure not to move the stencil.  Whatever method works best of the materials you have on hand.  I would recommend putting a piece of cardboard behind your work, because the paint might leak through it and make a mess of your work space.

I did a combination of the two methods, my printer was not working at the times, so I wrote what I wanted on a piece of cardboard and cut it out to make a stencil.


4) As you wait for your banner to dry you can cut your dowel down to the right size.  I would recommend it to be 3-6 cm longer then the width of your banner. To cut it, score the wood with your scissors and snap and the dowel will break to the right size. I spray painted the ends of one of the dowels but it leaked in my wood a bit more than I was expecting, so I would recommend painting it with a brush and probably letting it dry more than I did. Or leaving it the wood bare, which I did for another project and I much preferred the look.


5) Sew the felt together to make a loop for your dowel to go through, just by hand stitching the end down. If you’re not really one for sewing you can also just glue it down with some hot glue.  I also stitched around the edge with my sewing machine to add some colour to the project, which you can do if your so inclined.


6) Tie the yarn to the dowels on each side of the banner. You don't really need more then a foot and half of yarn, just knot it at the base near the dowel with whatever knot your most comfortable with.

7) Hang it up and enjoy!!  Feel the demodivation!


If you make this,  be sure to let me know in the comments, or post a photo on instagram and tag me (@chipkeycreations).

Note: If you live in residence, use tape or one of those removable plastic hooks to attach your banner. I don’t want you to be getting in trouble for putting nails in your walls, also because your walls are most likely concrete and that does not lend itself to being nailed.

Friday 15 May 2015

How to Bring New Life to Old Planter (or How to Make Boring new ones Awesome)

Spring has sprung! 

It’s finally getting warm up here in Canada and its fantastic.  Garden centers are starting to pop everywhere around where I live and I can only assume the same is happening for you (which I know is a silly assumption to make on the internet).  There’s a long weekend coming up for me and I want to start working on my garden!  Today I want to show you a gardening DIY that you can make in weekend, (probably even less).  It’s pretty simple but it really packs a punch in any backyard.  This idea started when I noticed that plastic flower boxes are really over prices, I'm not willing to pay $30 for a piece of plastic that I only use 4 months of the year.  So I decided that would take simple inexpensive flower boxes and make them awesome.  My parents donated their old flower boxes to me that they hadn't used since they changed the layout of their backyard a couple summers ago.  So project only cost me the cost price of the spray paint, which I’m using in other projects, the other materials I found around my house and you probably can too.


Materials:
-Simple Flower boxes (if you can’t find used ones, your local dollar store or garden will have a basic (ugly) flower box for a couple bucks)
-One or two cans of spray paint in the color of your choice, I’m using Krylon Colormaster Metallic in the color Silver and Gold. It has a built in primer which is kinda nice to have in your spray paint
-Painters tape
-Newspapers
-A beautiful day free on much humidity, this will allow your paint to dry faster.

What to do:
  1.  If your using a old flower box you need you clean it.  I just went into my backyard with my house and a rag and washed all the dirt off.


Before cleaning the planter 


2Leave it in the sun so they can dry, don’t forget to flip them over so they both
 sides can dry


After cleaning the planters 

 3.
.Lay out some newspaper on your working surface (I’m using the lawn in my backyard).  If you like add some rocks on the edges of the paper the wind won’t blow it around as much.   


4.Spray a base coat, be careful not to get paint on yourself.  Give yourself about half an hour before you flip it over to do the other side of the box and probably more than an hour between coats to make sure the paint dries. Be mindful of wind directions when you’re spraying.  You don’t want to be down wind of all the paint dust that flies up.  Also be located in a well ventilated area, I did this outside because there nothing better ventilated than nature.  For this I covered the whole thing in silver first just to ensure there wouldn't be any green showing through the spots were the two colors intersect.       

5. If you want to do some color blocking you'll take your painters tape and us it to block the area. I used to different patterns for the two flower boxes that I was using.  For one the top will be gold and the bottom silver, and the other silver and gold strips that match the curves of the box.  You want your tape and newspaper that fits the area you want to block out.  

The Planters before the gold was added 

6. Spray paint the second color if you want to do that, and add coats as needed.  I needed to put two for the gold to really look good. 

Both planters after one coat of gold

7.Once everything is dry, slowly peal off all the tape and newspaper
Look at that crisp line
With that your done! Fill it up with some dirt and you now have an awesome flower box without having to break the bank at the garden center. 


Leave a comment below if you have any questions I'll try to answer them. 
Happy Spring! 


Tuesday 3 March 2015

A Neon Hat!

Hello,

This is a short blog post about a hat I made last weekend.  I had finished all the project that I was working on the week before and there was a calm in my classes.  I was a little lost on what to do.  I felt like I had a done a lot of projects for other people and I want to make something for myself.
Treat yourself and all that jazz.


So on Saturday night my roommates and I started to watch a movie and I began casting on some neon yellow yarn that I had for close to a year.  I got it shortly after making this hat, which is a favorite of mine.  I simply got busy and forgot about the yellow yarn until I saw it on my shelf earlier this month.


I followed a pattern I found on Ravelry a while back and Favorited ( Super Easy Fall Hat, which is the perfect description of this pattern).  

By the time I went to bed on Saturday night I had knit up about 6 inches, around 2 and half of ribbing and the rest just knit in the round.  I really lost track when I was got going on the knit part, my fingers just when through the motions as I just chilled and watched movies.  This pattern is great if your just starting to learn color work, since it is a relatively simple design.   


Sunday after dinner I picked up the project again and started the color work which I believe is only 6 rows. So it didn't take much brain power, which after midterms was great.


In no time at all I was doing my decreases and weaving in the ends.  This pattern was great!  I think the yellow is so bright and in your face but the grey tones it down so you don't look like a crazy neon person. I've worn it a few times already. But it's still really cold in Canada (like -25 Celsius) so I've been wearing bulkier hats.  The one down side to this hat is the fact the yarn  I picked acrylic yarn so it doesn't have great insulation properties.


That's pretty much it, I just wanted to show off my new hat.  Comment, share and all that fun stuff. 

Zoe 

Thursday 29 January 2015

Finished Object Friday!

Happy Friday everyone!


I finished this project last week and I just want to share it with you.  It's some Newfoundland style mittens for my dad.  I'm assuming that the pattern was designed over there, but I'm not sure.  But there really warn since there pretty much two layers.  Which if you live in Newfoundland and other cold places is super practical.  I made sure to use wool instead of acrylic to ensure that they were as warm as possible.

I just wanted to show some photos of the mittens.


Have a good one,


Zoe

Thursday 8 January 2015

Dying Yarn with Food Dye

Happy New Year!

I hope you had a pleasant start to 2015 and haven't strayed too far from your resolutions (if you've made any).  My resolution for this year is to post here more frequently, we'll see how that goes. I'm really bad at motivating myself to write, also I have homework that gets in the way.

Today I wanted to share with you a project that I tried and I think turned out really well.  It's this dying technique I learnt about from watching a video by ChemKnits ( Link to the Breaking Delphinium Blue video here). I liked ChemKnits video's I think she's supper knowledgeable and I found them very relaxing to watch as I did homework. Its taking white yarn and dying it with food dye and the colours in the dye will break apart and create different colours throughout the yarn.  I fell in love with the colour food dye she was using so I went out and both the same one, Delphinium Blue is a really pretty colour and its made from blues and purples so it breaks when you dye it and I love the final result.

Here's my yarn 

So I got my yarn at a farmers market over the summer.  It a goat cheese farmer called Milkhouse Farm & Dairy  (their website here) but he also sold yarns and blankets.  He knew I was a knitter because "only knitters buy yarn in August, in 30 degree [Celsius] heat".  He wasn't wrong, it turns out that he was a crocheter so we had a nice chat.  So I got this 2 ply 100% sport weight wool and didn't do anything with it for the longest time.  I knew I wanted to dye it but didn't have any of the materials to do it.  Also it was the summer and I really didn't want to heat up my house more then necessary by boiling a bunch of water.

So this is my experience of dying yarn with food coloring.

Materials:
-One skein wool
-Food colouring paste (I got mine from Bulk Barn)
-Vinegar
-Pot of water


I got a pot of water with some vinegar added in. It better to add to little than too much when it comes to the vinegar.   I probably could have added a little less vinegar but it still worked.  The vinegar is the acid that will help the dye bind to the yarn. I stirred in some of the dye until it was a really dark blue colour.  It was two big dalopes.  If you really want to keep your hands clean wear gloves but I didn't so my hands got a little dirty.  Which washed away about a day later.  


I brought it to a boil and lowered it to a slow simmer before adding the yarn in.  Some websites that I read while researching this method say to wet the water first and to wash it but I forgot...  So I just tossed the skein in dry. I made sure it was completely submerged and covered it as it simmered.  I checked on it every ten minutes until the water is clear.  I made sure I didn't mixed it to much to ensure it didn't felt during this process.

Me at the stove adding the yarn in


Once the water was clear, I recommend using a metal spoon when doing this so you can see the colour of the water better, I turned off the stove and let it cool down until I should pick it up with my hands.  I ran it under some water to make sure there wasn't any dye that wasn't absorbed into the yarn.  I hung the skein on a hanger and hung an other one off the bottom to make sure it it didn't curl up.  I put it my bathroom to dry so if it dripped it would just go down the drain.


I love how it looks!  The colours are so nice and photos don't quite capture it. I haven't picked any projects to use it in yet.  I have some other projects lined up for other people so I'll get to it eventually.  Maybe that will be part of my resolution for 2015.  Let me know what you think down below.

That is all for now,
Zoe