

I was in Michael’s a while back, in the needle point aisle. I was itching to do some cross-stitching and was getting some supplies. While I was there I saw these cute plastic canvas squares. I think they are 3" x 3" and thought that they were perfect coaster sizes. So I decided to make just that. Also making these coasters would use up some of my stashed yarn.
Materials:
-Plastic canvas, you can buy the ones that are already in squares like I did. Or get a sheet and cut it to down to size with regular scissors
-Worsted Weight Acrylic yarn in two to three different colours
-A acrylic felt sheet in a complementary colour
-Sewing thread in a complementary colour
Supplies:
-Scissors
- A needle with an eye large enough to fit your yarn through
- A smaller needle for your sewing thread
Steps:
Step 1: Figure out your pattern
The pattern I created is inspired by a vintage needlepoint techniques book that I got from a garage sale.
Here’s a picture of the pattern I used, it is 26 by 26. The same size as the plastic canvas squares I got.
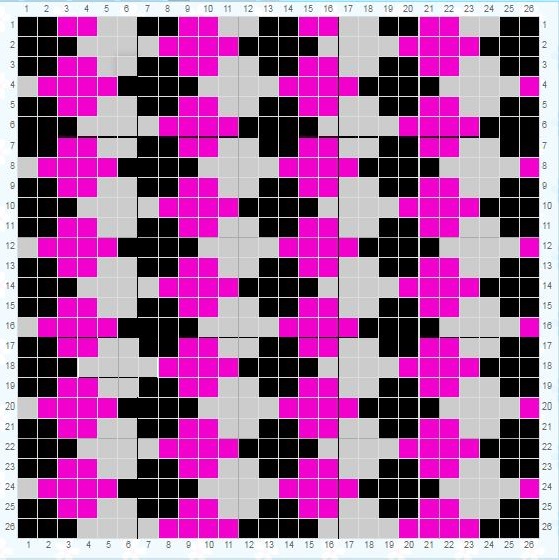
But you can do whatever pattern you want, by either drawing on graph paper or looking at patterns online.
Step 2: Making Top of the Coaster

Now you will use your yarn to stitch the coaster. Cut the yarn in the first colour you want to use, I used the black and cut to be about 30 cm or about a foot long. You a don’t want the yarn to be too long or it will knot on you and make your life miserable. It's better to use multiple smaller threads than one super long one that will knot. I also found that using short thread allowed me to change colours more easily since I didn’t have all this extra yarn hanging in the way.

Step 3: Finishing the Pattern
Continue stitching the pattern and once your running low on yarn or finished with that colour, on wrong side of work poke your needle through a few of the little loops that the stitches create and cut the extra thread.

Step 4: Cutting the Felt
Once you’re all done with the design of the coaster and cut the extra threads, lay it on the felt, trace it and cut a square that is the same size of your coaster.

Step 5: Hiding the Ugly Parts
With the sewing thread and needle you’ll want to sew the outside of the felt to the outside of the coaster.

Since the sewing thread is much thinner than the yarn, you can knot it without adding bulk to the work.

Sew the felt to the coaster by stitching it on to the outside loops.

Go around the outside of the work. Try to keep the stitches close to the edge of the felt but not so close that it will easily rip out.

Once you've gone around, just knot and cut the thread

Step 6: Hiding the Thread
At this point you can still see the plastic on the outside of the coaster. With a yarn that is one of the color of your coaster go around the edge of the coaster .

Poke the yarn through a few loops of the thread you just sewed to anchor the yarn.

Go around the coaster trying to make sure that the yarn is covering the plastic canvas and thread. Don't bring the yarn through the felt, it will be really hard to pull through and might tear the felt. You want to just use this yarn to wrap around the plastic edge.

Once your made it back to the point where you started, poke your thread into felt and bring it back out a inch or so close to the edge.

Cut the extra thread as close to the felt as possible.

And your done!

I really like my coaster that I’ve finished so far. I want to make a full set but I haven’t gotten around to finishing them (I’ll let you know when I do) I was worried that it would melt if I put hot drinks on it, but that it not the case. I've been using the coasters I've made for a few weeks now and its been great! I have put mug of tea on it multiple times and nothing awful has happened!

If you end up making this let me know in the comments, or tag my on instagram (@ChipkeyCreations) I would love to see it!!
Cheers